
Running Solar Fire and Other Windows Programs on the Mac
We do not officially support Solar Fire on the Mac, but we have many customers who do successfully use Solar Fire on a Mac equipped with an Intel chip, Windows, and a Windows emulation program like Boot Camp, Parallels, Virtual PC or VirtualBox. Besides doing emulation, these virtualization or "bridge" programs isolate the Windows environment from the Mac environment so viruses can't jump from one side to the other.
Please note that Solar Fire will not run on an iPad.
Do I need to run anti-virus software on my virtual Windows?
ANSWER: This depends on how you work with your Virtual Windows. If you never connect to the internet on the Windows device (no websites, no emails, no program updates, no downloads, no Solar Live), then you do not need an antivirus for your Windows.
If you ever go online and visit websites, check email, or update programs (including Solar Fire or the Solar Live notifications) then you DO need anti-virus and anti-spyware software for your PC side. (Even if you have anti-virus software on the Mac side, it can't protect the PC side.) Your virtual Windows can become infected by a computer virus or malware just like any other Windows system.
Putting Windows on Your Mac
All of the Windows emulations on a Mac require that you have a Windows disk and a license key (serial number) for Windows that you are not currently using somewhere else. An old Windows installation disk from an old derelict computer should work. Solar Fire Gold v. 7 or V8 will work on any Windows version from Windows ME and NT onwards, so you can use an old version of Windows with Virtual Box or Parallels. See below for details about the Windows requirements of the various emulator programs.
Here are notes on using each emulation program, and also on getting the Mac keyboard and mouse to function more like the way they do in Windows.
Using Boot Camp
We recommend using Boot Camp, which comes free with newer Intel OS-X Macs (or can be downloaded free from the net) and is simpler to use than Parallels. On our office MacBook laptop, Boot Camp runs Windows programs as fast or faster than they run on a regular PC. Boot Camp’s only drawback is that you can run either Windows or the Mac operating system, but not both at the same time. To switch to Windows, you need to close the Mac op system and open Windows, making it hard to share files between the Mac and Windows parts of your computer. If necessary, you can copy the files generated in Windows onto a flash drive before rebooting in the Mac op system and using the files there in applications such as email. For more info on Boot Camp, visit: https://support.apple.com/kb/ht1461
You’ll find instructions for installing Boot Camp by selecting your Mac’s Help menu and searching for “Boot Camp”. There are also instructions at this site: https://www.apple.com/support/bootcamp/. It's easy to make a Windows partition, and you can change your mind later and easily take Windows off again in a couple of minutes.
With Boot Camp you need to load a full version of Windows 7, 8.1 or 10. If possible, we recommend getting XP or 7 rather than Vista. If you are installing an upgrade version of Windows, you can't eject the upgrade CD when you are asked to insert the older Windows CD. (However, if you have an external CD drive you can insert both CDs at the same time and it will work. Put the older Windows disk in the external CD drive and just press Enter when the Windows install program asks you to insert the old CD.)
By the way, Boot Camp will make a Windows partition and format it for you, but you still have to let the Windows installation program format it again or it won't install properly. If you don't use Windows much, then let it make the default a small-sized Fat32 partition (which OS-X can also use). If you use Windows a lot, you might want to make a bigger partition and let Windows format it with ntfs.
Using VirtualBox
Update December 2023: Mac users have reported that newer Macs with Apple Silicon chips will NOT run VirtualBox.
Our second recommendation would be to use VirtualBox. Sun Microsystems sponsors this free emulation program which lets you set up Windows inside a file on your hard disk, thus enabling you to run Windows on the Mac desktop. It is fairly fast, and it also works on Linux. We have tried it on the Mac. It's only a little harder to set up than Parallels and it works quite well. There's more info on VirtualBox at www.virtualbox.org. There is an overview on the VirtualBox site here of how well VirtualBox supports various operating systems. There is also a good introduction with a screenshot of VirtualBox running Windows 8 on a Mac in the beginning of the online VirtualBox manual.
The VirtualBox emulator will work with older versions of Windows but it doesn't have drivers for hi-res video. The video driver that we used to load Windows ME and Solar Fire on VirtualBox is no longer available. Right now we have no more recent information.
Using Parallels
Note: Every time there is a Parallels update, you will again need to turn off the Sharing setting(s) below.
Parallels lets you run Windows inside a window on the Mac desktop, and you can run other operating systems on the Mac without rebooting. You can find more information on Parallels at https://www.parallels.com/.
Please note: We provide information about running our Windows software on a Mac platform as a courtesy but do not officially support running Solar Fire on a Mac.
With the current versions of Solar Fire v. 7.0.1 and higher, Parallels users MUST turn off Shared Profiles / Sharing.
The shared profile setting tells Parallels to share your documents folder with the Mac, but it is not compatible with a lot of programs and Solar Fire can't find any user files when it's turned on.
All Sharing between Mac and Windows must be shut off or disabled in the Parallels software in order to run our Windows programs, including Solar Fire.
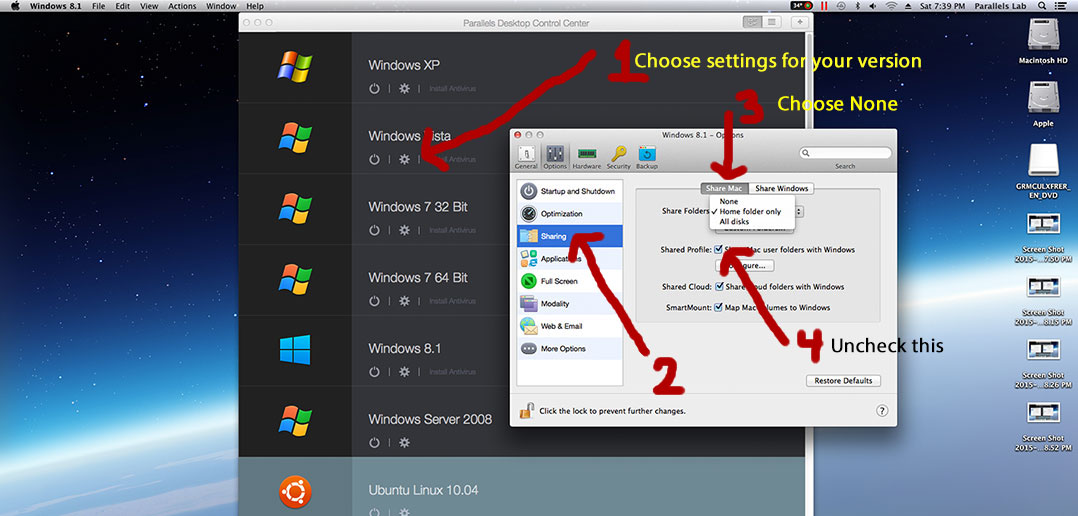
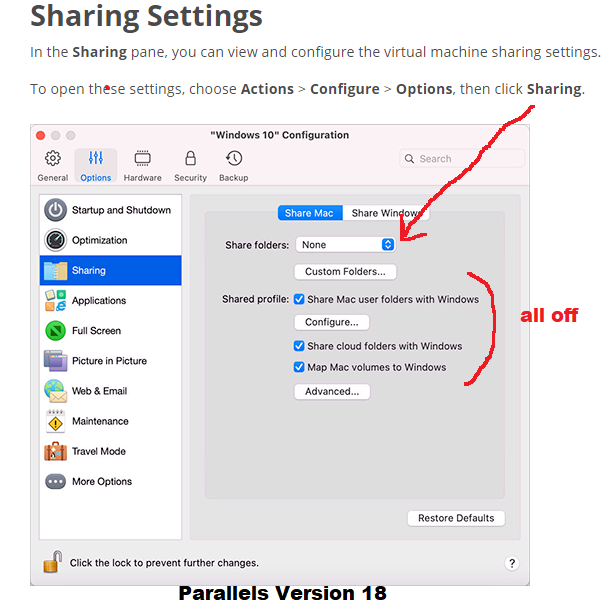
The image above is an example of approximately what the setting will look like in your version of Parallels, but it will vary depending on the exact version. Please note that we attempt to assist our customers when we can, but we cannot keep track of numerous software updates, which is why it is best to go to Parallels website support for the most accurate information on using Parallels to run Windows programs. https://www.parallels.com/support/
How to get to the necessary setting in Parallels version 18: https://download.parallels.com/desktop/v18/docs/en_US/Parallels%20Desktop%20User's%20Guide/43123.htm
How to get to the necessary setting in Parallels versions 8 - 10: https://kb.parallels.com/en/6912
How to get to the necessary setting in Parallels version 7: https://download.parallels.com/desktop/v7/ga-locales/documentation/en_US/Parallels%20Desktop%20User%27s%20Guide/
Go to Use Windows on Your Mac > Set How Windows Works with Mac OS X > Share Items Between Mac OS X and Windows > Share Files and FoldersHow to get to the necessary setting in Parallels version 6: https://download.parallels.com/desktop/v6/docs/en/Parallels_Desktop_Users_Guide/22694.htmAfter you turn off the shared profile setting you must tell Windows to restart and also allow Parallels to move your document files back to the default location if it asks you for permission to do so.
For those using Solar Fire version 6 and earlier, you can leave the shared profile turned on.
Parallels users report that they can simulate a Windows right mouse-click by pressing Control and Shift as they click.
Using VMware
Update December 2023: Mac users have reported that newer Macs with Apple Silicon chips will NOT run VMware.
There is a setting in VMware called 'Shared folders' that needs to be turned off. Be sure the virtual machine is open in Workstation and click its tab to make it the active virtual machine. Choose VM > Settings > Options and make sure 'Shared folders' is turned off. More information on shared folders in VMware is at: https://www.vmware.com/support/ws5/doc/ws_running_shared_folders.html *
* Note that this linked article is for older versions of VMware Workstation, but the settings are the same or very similar in newer VMware Workstation versions.
Using Virtual PC
This older emulation program does not run on any Windows version newer than Windows 7, and if you choose to use it you will need to download fixes with the program. More information is here: https://www.microsoft.com/en-us/download/details.aspx?id=3702
When the Windows software says you need to press Control while you click, in Virtual PC you have to instead press Control and Option while you click.
Using Crossover or Wine
UPDATE March 2024: Solar Fire 9 will NOT run with Wine. WINE ( = Wine Is Not an Emulator) does not work on its own; it must have Windows. Users report that they are unable to run Solar Fire using Wine.
Nova Chartwheels may work on Crossover which you can review at https://www.codeweavers.com/. The same is true for Wine; you can look at the Wine website for more information https://www.winehq.org/.
Adapting the Mac's Mouse and Delete Keys in Boot Camp
Using the Mouse
If the wireless mouse made by Apple doesn’t work in Windows, you might have to use a wired USB mouse instead. Most of the time I plug in a PC USB mouse, simply because I love my mouse wheel. This isn't as much of an issue as it used to be, especially since Apple has begun offering two-button mice.
Adapting the Delete Keys
On the Windows keyboard, the Delete key deletes the next character, and the Backspace key deletes the previous one. The Mac keyboard has only a Delete key, and this deletes the previous character. If this bothers you, you can get a keyboard hotkey program and reprogram the Mac’s right-hand Command key to be a Delete key that works like the Delete key on a PC. (The Command key on the Mac is the same as the Windows key in Windows, but there are two of them and you need only one.) Here's a link to a free hotkey program called AutoHotKey: https://www.autohotkey.com/docs/misc/Remap.htm.
If you use this program, click on button #62 and change it to say 'Del'.
For workarounds in emulators other than Boot Camp, see the websites for those programs.